 |
|
MULTIBALL & SPEECH |
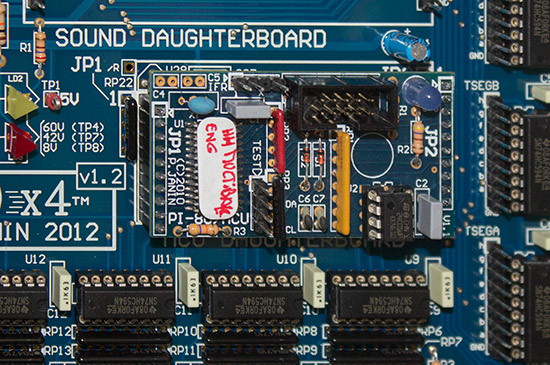
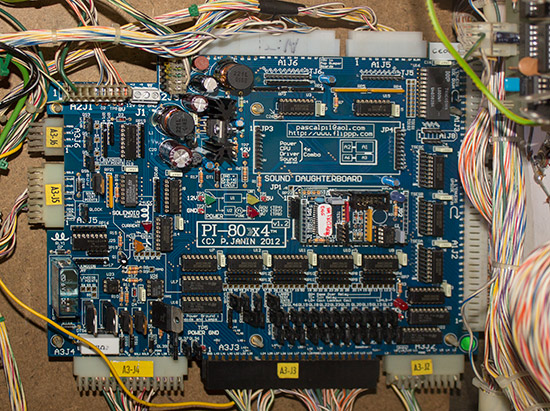
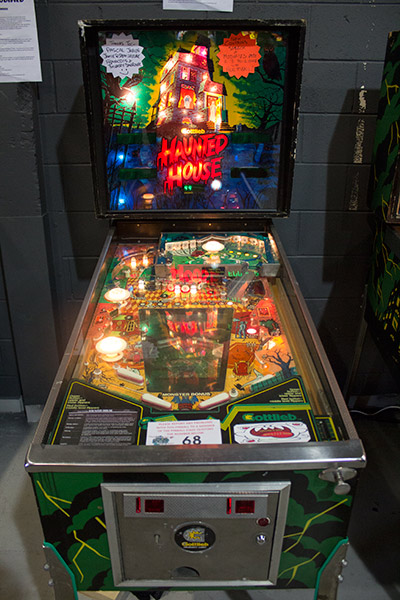
Date: 15th November, 2012 Article by Chris Williams, a.k.a. 'Poibug' One of the highlights of this year's Northern Lights Pinball event in Manchester was the debut of a Gottlieb Haunted House machine with some special modifications. Chris Williams tells us all about this most unusual game. WHERE IT ALL BEGAN It was the end of July 2012, and I saw a post on www.flippp.com mentioning a Haunted House with multiball and speech. I was very intrigued by this. Firstly, how on earth do you add speech to a game that never had it? And, for me at least, how do you make Haunted House a multiball game? I saw Pascal Janin was involved in the project (along with his friend Cedric) and that it used one of his PI-80 boards. I was familiar with his work as I already own a PI-80 - a Gottlieb System 80 driver, CPU, and power board in one - that I had bought (if I recall correctly) in Nov 2011. I also have a PI-1 - a Gottlieb System 1 CPU board. After using his boards, I knew how good and how thorough his work was, so I knew it would be good. So, on July 28th, 2012 I e-mailed him, and received an e-mail back a few days later on August 1st (once he had returned from his holiday). Basically at that point I had asked, “Regarding multiball, is it just a case of adding the extra balls, or is some additional wiring/hardware needed? (e.g. switches)” His reply was; “Yes indeed, my PI-80 will turn your HH into a true, much more enjoyable to play multiball game. It would even speak! But there will be quite a lot of hardware changes on your playfields to make it work that way. Our plan is to make all the changes, let people play our proto game as much as possible during our various French pinball expos. Then, once it's 100% reliable and satisfactory, release a FREE detailed manual which explains how to do it yourself. This will most probably be available by end of this year” Well, firstly I was chuffed that this could be do-able. I've always liked Haunted House, but preferred Black Hole. I like the System 80s, as I also own Volcano, Mars - God of War and Spirit, but always felt that Haunted House would have been a waaaay cooler game with multiball (and speech). So this seemed right up my street - apart from the fact it wasn’t fully finished yet, was months away, and sounded a fair bit more than a plug-and-play mod! Anyway, at that time I had the mad idea of trying to get this done in time for the Northern Lights Pinball show – part of Play Expo. I was one of the organisers of the pinball part of it and thought it would be very good to have it done in time for our show on Oct 13th/14th. I dunno why I thought that could happen. After all, Pascal said it wasn’t fully complete, they were trying to do it in time for their show on 22/23 September, and that really wasn’t all that far from our show! So the idea was a bit hopeful to say the least, but I decided to go ahead anyway and hope Pascal was OK with this, and his mate Cedric too. Thankfully they were. The thing on my side was Pascal has awesome English! And it looked very much from the outset that this could well be the greatest Anglo French co-operation since the Channel Tunnel! :) I thought that there was going be a whole lot of e-mails here - and boy was I right! You have to understand how at this stage they had a working prototype, but this was still work-in-progress that they had been working on for a while. And they too were under self-imposed pressure to get it done for their show, let alone having to complete and test theirs whilst at the same time back-tracking to make drawings and check what they had already done, translate it to English, get the information to me, as well as carrying on with family life. So I knew right from the start it was gonna be a BIG ASK. I was working 4-days-on, 4-days- off at that time, so had days available to me to get stuff done. But they were working normal time. I could be off from Monday to Thursday, whilst everyone else is still at work. Let the e-mail bombardment commence!
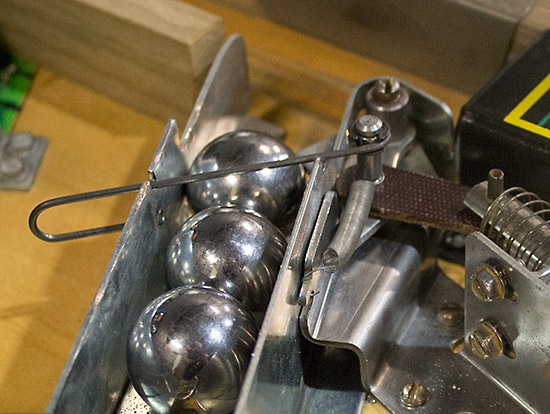
Basically, after a few e-mails and pictures I was starting to get a rough idea of what would be required. At that stage it was another ball-release solenoid for the main trough and a few switches. The ball-release solenoid was going to be a problem as Gottlieb parts are not easy to get in the UK. I knew it wasn’t a problem that would stop the project as I could borrow from my Volcano game. But I still needed to source one as I did not want to leave a game of mine unplayable. Luckily Jamie from 5 Play Leisure came through (good man!),and at least that part was sourced. At that stage I did not have many details on what I needed to do EXACTLY - but at least I knew the theory. So, me being an impatient git, went ahead and drilled the holes in the trough area of the playfield for the extra switches and ball-release solenoid. I used dimensions from my Volcano as the basis for the holes I needed to cut in the playfield. The good thing about this concept of me just doing things on my own was less work for Pascal in measuring etc, although the big risk was how I was just 'winging it' - albeit with knowledge of the theory - and the danger it could all go terribly wrong. Well it all worked out sort of OK. I copied Volcano and added two extra trough switches and playfield cut outs, as well as the playfield cut-outs for the ball-release solenoid. I also had to drill a hole through the metal ball trough guide, and file out a slot for the ball-release mechanism stop wire to pass through.
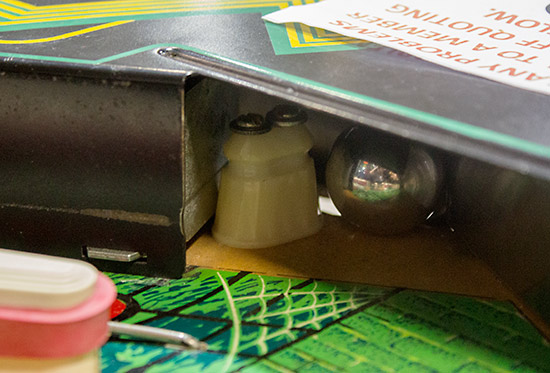
Also two holes were drilled for the extra trough one-way gate. A minor bummer was I actually only need one extra switch to tell when there were three balls in the trough, so I have an extra switch and slot in there doing nothing! But it was worth it, as I was starting the mod!
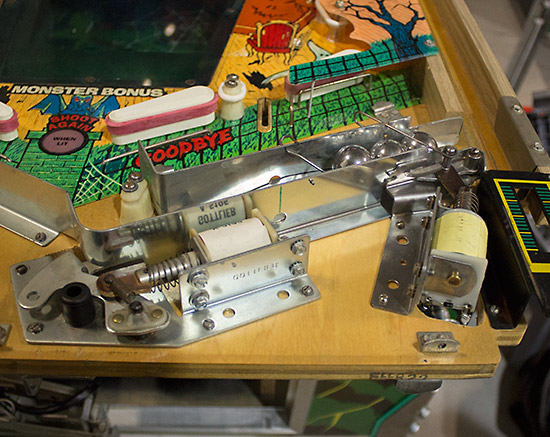
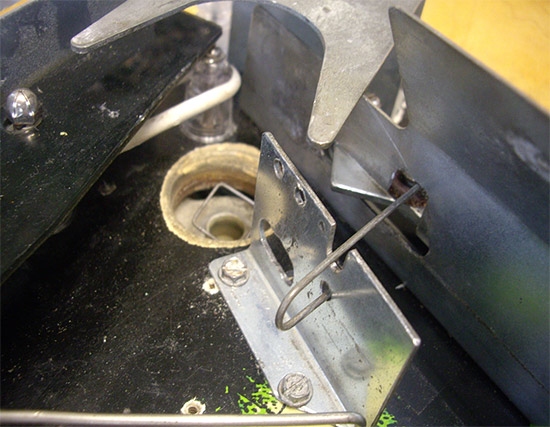
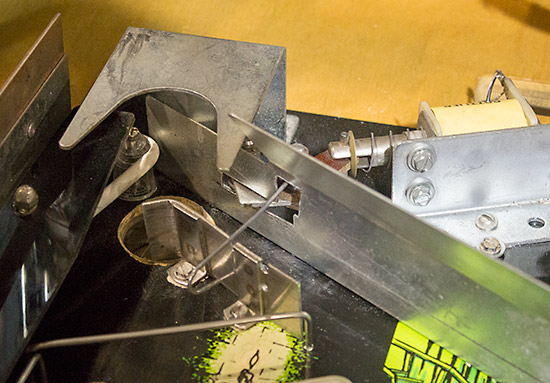
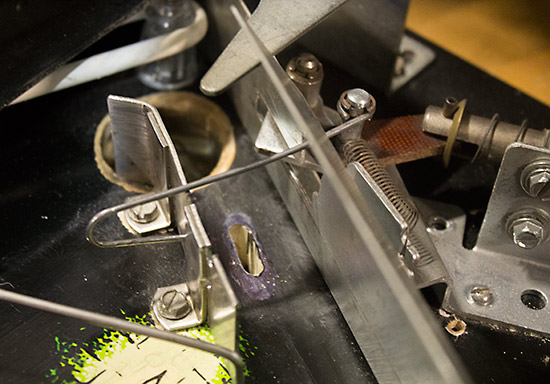
It was all seat-of-the-pants stuff, and a lot of the time I was receiving additional information; such as this from September 13th; “Tomorrow I will test a mod on the game. Until now, the multiball jackpot would be given when all 4 top drop targets would be hit while at least 2 balls are in play.... which is almost impossible in multiball. So I will change it to when all 1-2-3-4-5 targets on main PF are hit. Should be easier, as balls end very often on the main PF.” Being the geek I am, it was kind of cool to be part of such an awesome project on the fly. I may not have been able to contribute much, but I could occasionally offer an opinion or explain to Pascal how the unmodified game did something (don’t forget, he couldn't do this on his Haunted House any more as it was no longer original). As time progressed I learned of some more work I had to do - re-wiring the main relays. On September 16th I received lots more pictures from Pascal showing the relay wiring changes, and the modified lower playfield area. At this time I also found out that another ball release mechanism would be required on the lower playfield, as well as a new lower playfield ball guide (like a mini lock area). This is needed because if two balls enter the VUK it would almost certainly cause a problem as the game struggles with just one ball! This is why a non-return gate has to be added also. Again, Jamie at 5 Play Leisure helped me out and supplied me with yet another ball-release mechanism. I was not fully sure how all this went together, so I e-mailed Pascal asking for more information, such as the theory of how it worked, the dimensions required, etc.
There were a fair number of changes to do here - all required to stop more than one ball getting in the upkicker:
Using pictures I had been sent, and to save me bombarding Pascal with more e-mails, I went ahead and started the lower playfield modifications using the pictures he sent to figure out datum points. The wire guides were made and fitted using the artwork as datum points for the sizes of wire guides needed and where to put them. The L-shaped cut-out in the existing main metal guide for the ball-release solenoid was figured out using his pictures and parts at hand for reference. I decided to hold off making the new angled-bracket, and the lower playfield switch cut-out until I had more information from Pascal.
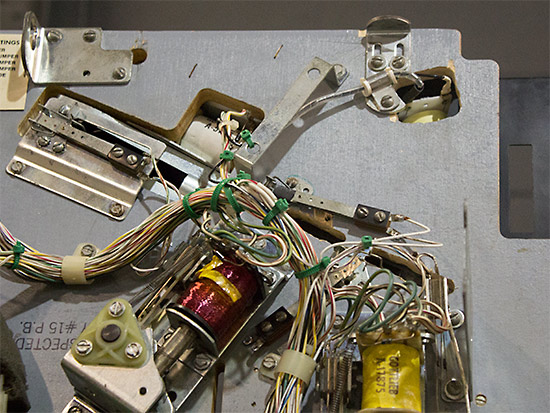
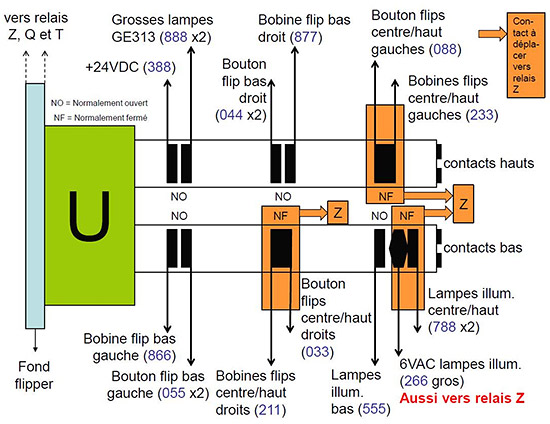
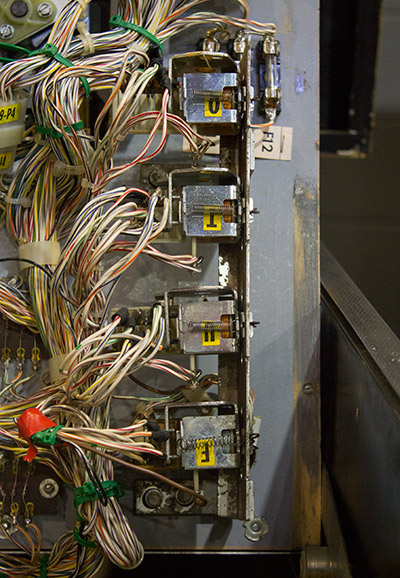
On the original Haunted House there is no need for the main or upper playfield flippers to work when a ball is in the lower playfield, as there is only one ball. However, when you are adding multiball there will be times when you need all the flippers to work at once. This entails rewiring relay U on the underside of the main playfield and adding another relay – relay Z as Pascal called it. He sent me a file on Sept 17th detailing the changes.
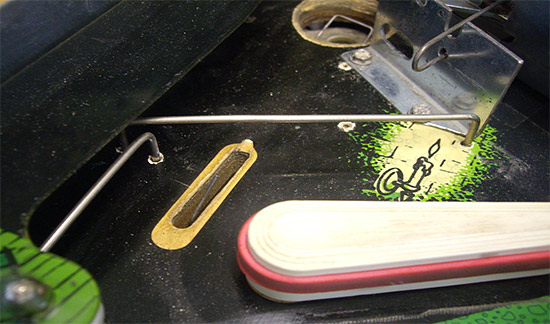
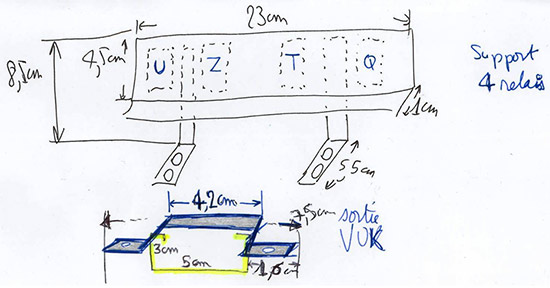
As you can see, the relay contacts highlighted in orange move to the new relay Z. At this stage I had no idea how the coil of the new relay was to be wired, though I guessed (correctly as it turned out) that the positive would be from relay U, and the drive would come from the backbox. Pascal confirmed this on Sept 19th, as well as telling me he would shortly send me a PI-80 – albeit without the HH multiball software on it. He also sent me a hand drawn picture of the new relay bracket on the same day, as well as a picture of a new non-return gate that was to be added at top of the upkicker tube.
The day I was sent that, I actually found a Gottlieb relay bracket which had space for the new relay.
The non-return gate is needed at the top of the tube because if two balls entered the VUK at the same time, it would almost certainly cause a problem - it struggles with just one ball!. Hence the reason why the non-return gate has to be added, as originally you could shoot down the upkicker tube. As it turned out, I had a NOS Gottlieb non-return gate which fitted fine with only minor modifications needed.
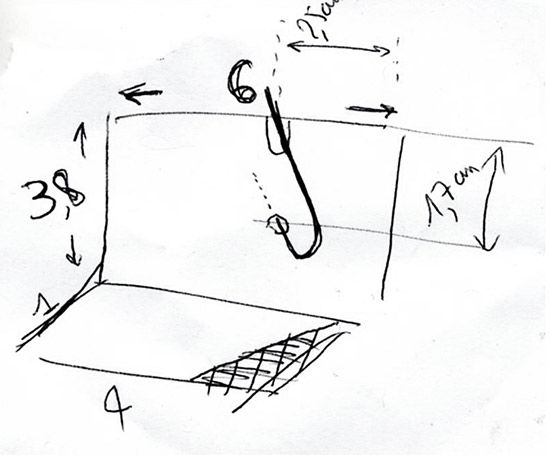
On the 20th September I e-mailed Pascal for a bit more information on the lower playfield changes, and also to find out where the drive cable for the new relay would go to in the backbox. He replied with many more pictures and details on the 21st, telling me where it was to be connected as well as a sketch of the lower playfield bracket with its dimensions.
I found an old guide and modified it, as it was of a similar size. Again I fitted it using my best guess as to where it went! At this point as I am looking back, it really is a great testament to Pascal here, as this point on September 21st was the day he was taking his Haunted House to his show in France. So there he was on that day, sending me information, pictures and tweaking the code, as well as preparing for his own show! I thanked him at the time and he said, “I need a twin bro and a 2nd life”. Indeed! On September 25th I received the PI-80 board, and a few days later more information from Pascal as well as him explaining that the game went down very well at his show, but he still had some software tweaks he wanted to do. As the software code for the multiball was still work-in-progress, he asked when was the latest date for me to receive the MCU daughterboard with the multiball software on it. I told him Oct 5th, as our Northern Lights show was on the 13th & 14th October, and I would need time to check it was all working OK. I then cut the hole in the lower playfield for the new switch and spent eons trying to set it up correctly. Even with the playfield not in the game it was having ball hangs with me just gently rolling the ball down to that area. The problem is, there can be very little speed in the ball in that area and that was causing ball hangs as the slow speed could cause it to come to rest in the new switch cut out. I also received details of where the wires went for the switches. Both the lower playfield mini-lock area switch and the main trough switches both picked up on existing switch matrix cables with a schottky diode added, and the software had these switch number assignments in its code. The main trough switch's number is 56. It connects between existing wires: For the lower playfield switch, number 61: I was also able to wire up both main playfield and lower playfield ball-release solenoids. The solenoid drives went to the PI-80 board, and solenoid power supplies were picked up from existing circuits with a new fuse and fuse block added to each solenoid. I had previously fitted a pop bumper board to drive the lower playfield upkicker, but Pascal’s still had it wired as it was originally with a relay. I hoped this would not matter. This was now 28th September and I must admit, the whole project was beginning to get on my nerves, as the lower playfield switch had taken way too long to try and set it up right (and would take even longer, as I found out later!), as well as carrying on with my family life and my proper work job to do as well. Plus I had my annual pinball get-together at my home on the 29th September to prepare for! Busy busy busy. My get-together went well and was probably a good distraction from the project, though was a shame the Haunted House was not finished in time for it. On 30th September the lower playfield hole got filled in, re-drilled, and a new cherry switch added and re set-up. Another 3½ hours gone on the PITA lower switch!
I also received information that Pascal had tweaked the software and also that a dual post needed to be added near the main trough. This is to stop two balls sitting on the trough coil at the same time. Luckily I had a double post and it was easily fitted.
Pascal said, "I had my youngest son trying it non-stop for half an hour :) Sometimes the ball locks itself in the ball release mechanism on the bottom PF, but it's a mechanical issue, not a bug: the game must not be leaning too high, otherwise the angle of the bottom PF is too low and the ball does not take enough speed when it enters the ball release mechanism.” So the lower playfield hang it wasn’t just my problem then! It was now only 13 days until the Northern Lights show – GULP! There was no software, and the game had not been plugged in or tested. It was going be a busy couple of weeks. On October 3rd Pascal re-tweaked the software and told me the MCU daughterboard had shipped from France. The delivery man in the UK seems to be in a rush and does not even bother knocking on the door or ringing the bell but just leaves an 'unable to deliver' card, despite my wife trying to flag him down when she hears the card being posted through the letter box. Grrrrr! More time lost and I have to drive 7 miles to the depot to pick up the MCU board. I finally got the MCU daughterboard fitted to the main board and powered up for the first time on October 5th. I must mention here, I noted the date of the code at boot up – Oct 3rd!
Initially the game, as you would expect, had a few niggles, including the lower playfield switch causing frequent hang-ups, but it was great to finally have it all powered up. I spent many an hour trying to get the lower playfield set up ,but it was difficult as I was out the house for 13 hours a day working on my job - but after much trial and error I got it all working OK and ready for the show. THE ADDED SPEECH Earlier on in the project I had contacted the creators of the Haunted House speech – the Davroux Brothers, and they had already agreed to supply me with the necessary info/software to make my multiball Haunted House speak for a small fee. I must admit whilst reading about the Haunted House speech on their website I was intrigued at their level of knowledge about System 80 stuff and the dedication required in figuring out how to re-program the SC-01 vocaliser chip, as well as all the other things they have done. But it’s all part of the fun for them. As they say, "We love to dissect Gottlieb's technology. Their pinballs have given us great times!". I must admit, this part of the mod is pretty straightforward. Change some jumpers to allow the board to use 2732 ROMs, then fit the new ROMs and fit an SC-01 chip. They sent me the speech ROMs on September 30th, and my friend burned the ROMs a few days later. The Davroux brothers do state that you need to use a B-20887-3 sound & speech board and not the -1 version, due to some circuit board problem. I had one of those -3 boards that had been tested OK in another System 80 speech game. However, when it was re-jumpered for the bigger size ROMs and tried in the HH game the speech did not work. Weird – especially as speech was OK in another game. In the end, all was fine when I used another sound & speech board. There are way more speech calls in this game now than there are on other similar era Gottlieb speech games and it does greatly enhance the overall game experience, especially the “Welcome to the Haunted House in multiball” at boot-up. For more info on this click here: http://www.flipprojets.fr/pdf/HHParlant_EN.pdf Please note: As this is not my work, I cannot supply these images to anyone else, and any e-mails requesting this will not receive a reply.
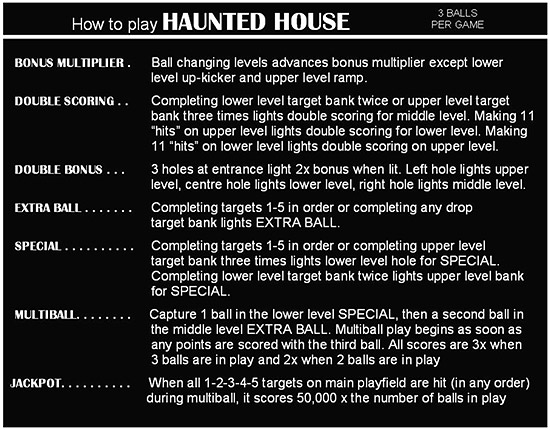
Well, I managed to get it all done in time, and fitted a new instruction card explaining the rule changes - how to get multiball, jackpot, etc.
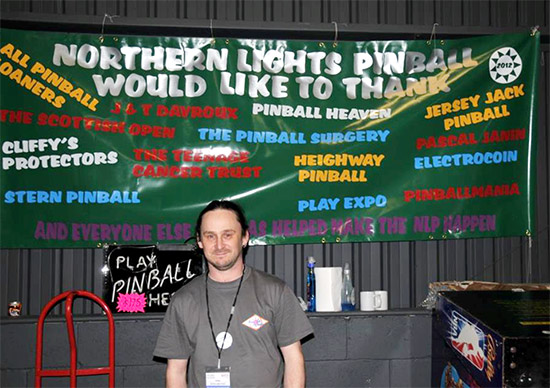
A fellow show organiser, Mark, did a big 'thank you' banner, and I ensured Pascal and the Davroux brothers were thanked!
I also added a 'thank you' instruction card and an A3-sized information poster near to the game that I saw a fair few visitors read over the weekend.
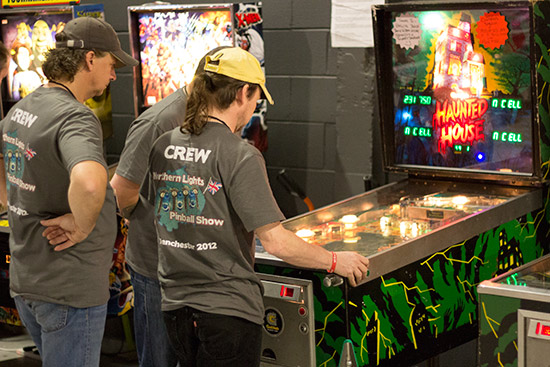
The machine went down very well, and everyone I spoke to was impressed with the whole concept and said how the multiball and speech added greatly to the game. Someone even said how they thought that after all these modifications, it felt like the game was finally “complete”. I had a few minor problems and, as you could probably have guessed, it was a ball hang in the lower playfield. But it only generally happened if there were 3 balls in the lower playfield ball release mechanism area – which isn’t too often. A video taken by a visitor at the show can be seen here. I have since spent a lot more time adjusting the whole switch mechanism, and after about 40 plays, as of Oct 30th it is trouble free - so far : ) I will probably change the rollover switch to an opto or a reed switch to try and get rid of the potential problem all together (if I can figure out how to do it). Plus, do some general tidying up, as it was a panic to get the game working for the show. Pascal added a thinner post to his game to make it easier to hit the extra ball hole, which starts the multiball feature.
For more information on the NLP and Play Expo show, take a look at the Pinball News report here. Thanks to Jamie at 5 Play Leisure in the UK for supplying me parts, Francois and Thierry Davroux for the speech, Cedric Berenger, and especially Pascal Janin for the multiball help. This is a bit of work to do the necessary modifications, but greatly improves the game in my opinion. You need the following parts to do this multiball modification
I've been speaking with Pascal and there are some more software tweaks to come in the future, such as making multiball harder to get second time around, scrolling the score displays to show information some of the time and scores the rest of the time, as well as other tweaks. PI-80 and other Gottlieb boards are available at www.flippp.com and are well worth it for the improved protection, better diagnostics, enhanced gameplay, bug fixes and other general tweaks.
© Pinball News 2012 |