|
INTRO TO ARDUINO |
|
Date: January 2017 WHAT IS AN ARDUINO? Great question! There are several versions (different board configurations) of the Arduino. An unofficial Arduino board is called a clone. We will be using a Five volt, ATmega328, Arduino Nano clone. An Arduino is a standalone computer based on either the ATmega168 or ATmega328 micro-controller (µC); the 328 being the more recent and powerful. The ATmega328 is a micro-chip using 32 Kbits of flash memory and 8 bit AVR processing. We “talk” to the ATmega328, via USB, on computers using Windows or Apple software (among other software types). To program the ATmega, we use a simplified version of the C/C++ programming language. Fortunately, we don’t have to be programmers to use Arduino boards. We can use the Arduino Integrated Development Environment (IDE) to create and upload our programs (sketches).
Another great question and yes . . . yes it can! The requirements for a machine to be a computer are:
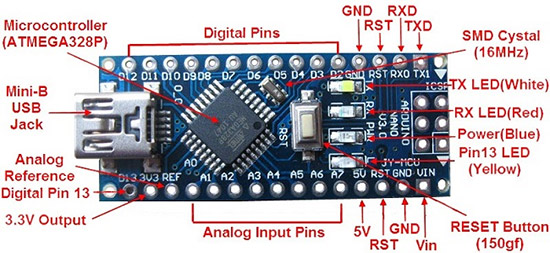
Yet, another great question. Here’s one in return. “What did you have for breakfast, a great big bowl of great questions?” Look at the two following pictures to see different parts of the “5 Volt Nano”:
HOW DO WE GET STARTED?
Link: https://www.arduino.cc/en/Main/Software Remember where you saved the programs and if there is a shortcut. Follow these instructions for your computers. Follow these instructions for our boards.
Soon, let’s plug in our Nano boards. First, plug the USB-A to Mini-B cable into your computers. Next, touch the metal of the mini-end. This will help make your Nano safe from Electrostatic Discharge (ESD). ESD is the shock we sometimes feel when we touch a metal door knob during the winter. Most of us don’t like the winter zaps. Imagine how our poor little Nano boards feel. Let’s load the first program, the “blink sketch”. Hold your Nano by the edges of its breadboard and connect it to your computer via a USB cable. Push or pull the connector end. Never wiggle the connector or pull the cord.
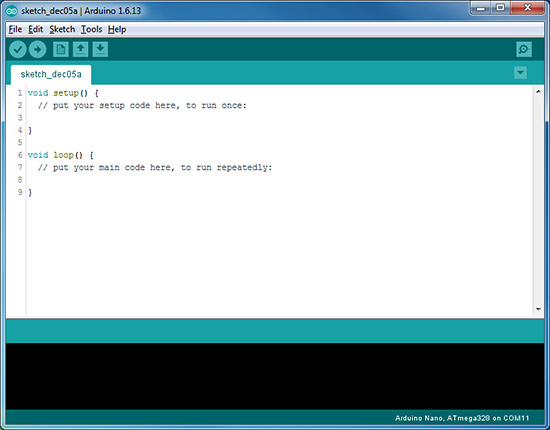
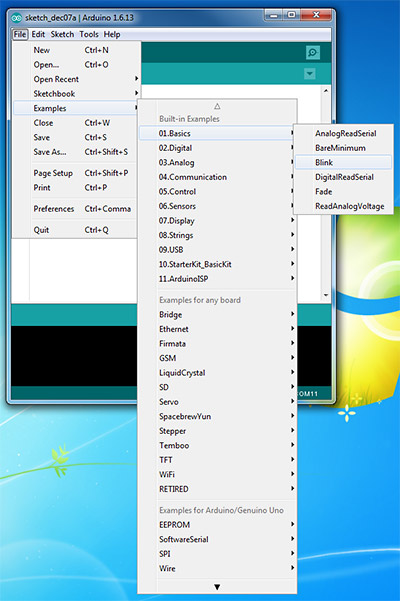
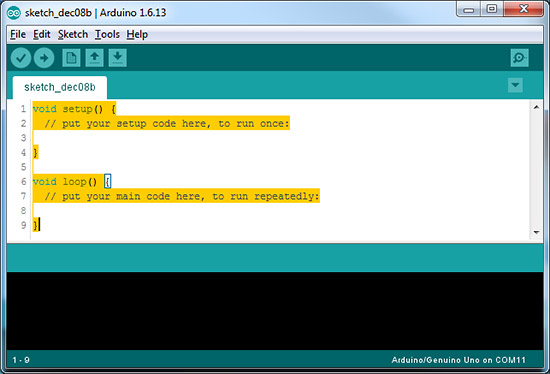
After the welcome screen we should see a window similar to the next picture.
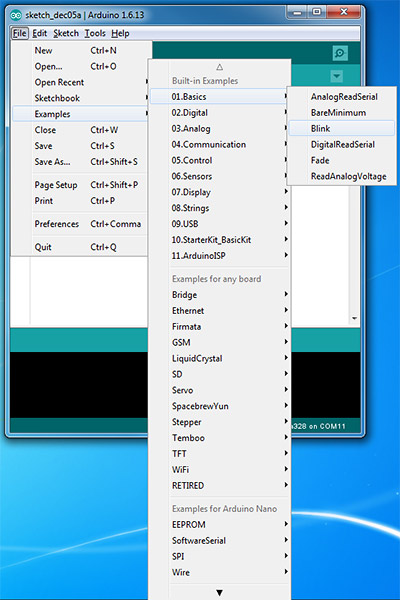
Navigate (drill down): File \ Examples \ 0.1Basics \ Blink
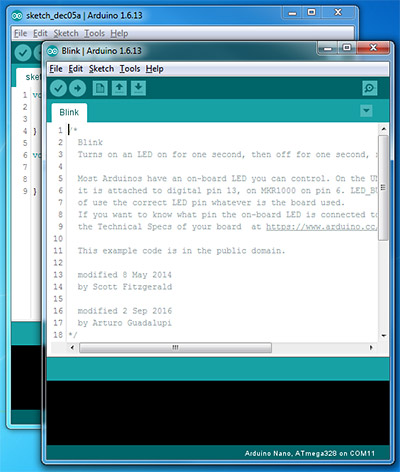
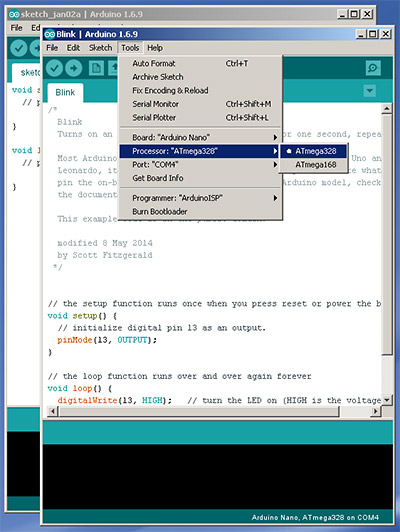
We should now see a second window, with the new one overlapping the first one; similar to the next picture.
Select: Tools \ Board: (“Arduino/Gunuino Uno”) \ Arduino Nano
Select: Tools \ Processor: “ATmega328” \ ATmega328
Select: Tools \ Port \ Com (As usually automatically chosen by our computers.)
Go back to or reopen the Blink window. (Select: File \ Examples \ 01.Basics \ Blink)
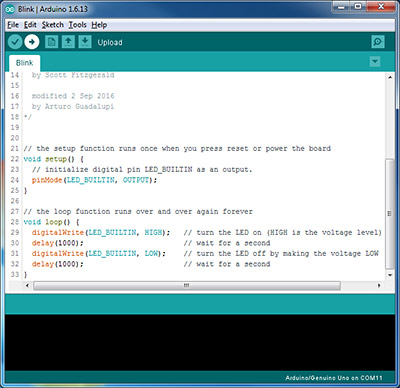
The Blink window should be in front showing something similar to the following.
Either maximize the window or use the scroll bars to view the sketch “Blink”.
Click the rightwards arrow (→) to upload and run the Blink sketch.
Observe the built in light (LED on pin 13.) blinking.
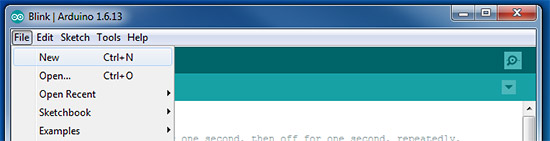
We can copy and paste the sketch we are working on, in a new window. Just, do the following. Select: File \ New (As shown in the following picture.)
When the new window appears, select and copy over the entire existing sketch. (See the picture.)
Copy and paste the following “FLASH” code into a new sketch window and upload that new sketch. void setup() void loop() The Arduino software will automatically try to get us to save out new sketches. For now, we will cancel out of this action. While our sketches are being uploaded to our Nano boards, observe the RX and TX LEDs flashing. If we missed the flash of the LED just after loading the sketch, we can quickly press and release the reset button. What happens each time we press the button?
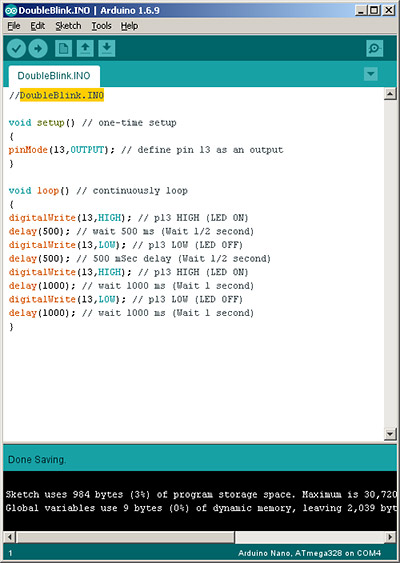
Copy and paste the following “BLINK” code into our open sketch windows and upload that new sketch. void setup() // one-time setup void loop() // continuously loop Now what happens each time we press our reset buttons?
Multiple sketchbook windows can be open simultaneously. We can use this to our advantage by copy / paste the sketch we are working on in a second window. The first window is used to save our progress. The second window is used to troubleshoot (edit) our code. Once we have selected our entire program to be edited, do the following. Select: File \ New (As shown in the following picture.)
Then, when the new window appears, select and copy over the entire starting sketch. (See the picture.)
Paste the “BLINK the LED” sketch into to new window. We can identify our new and unsaved window / sketch by observing its tab. The tabs of new windows are labeled “sketch_(current date)(letter)”. The letter increments for each new window opened.
Use this new window technique and add two forward slashes (//) to “BLINK” just before the second “delay”. This is called “commenting out” code. It is very useful for troubleshooting our sketches. void setup() // one-time setup void loop() // continuously loop We will use the reset button to try the sketch with one line (//delay(500); // 500 mSec delay (Wait 1/2 second)) commented out and without being commented out.
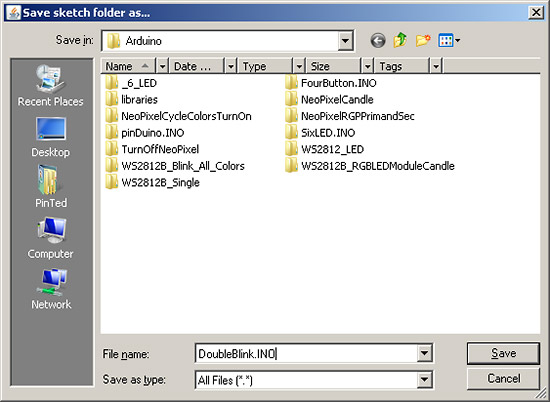
The tab of our saved sketch will have the name we chose to call the sketch. When we open the Arduino software, the most recently used program will load. Add two forward slashes (//) to the very top of the “FLASH CHANGED TO DOUBLE BLINK” sketch. After the slashes, name the program something that is meaningful. We will save the sketch as named. If we add “.ino” to the end of the name, it will be easier to look for in the future; as Arduino sketches are “.ino” files. Copy the entire name and “Save As” . . .”.
The sketch we just saved should look something like this picture.
Arduino sketches automatically get saved to a “sketchbook”, in the following default location, on Windows machines. Computer \ C: \ Users \ (User Name) \ Documents \ Arduino
Try not to confuse Arduino Libraries (Sketches to be included in other sketches.) with your Library of sketches. Not to make things more confusing, this is the Library folder in the Sketchbook folder. Each sketch will have its own sketch folder; as well.
Now that we have saved programs, and know how to work on them without losing what works, try: duplicating the “digitalWrite” commands, or changing “delay” times, or adding delays. Have fun!
ATmega328 Datasheet Summary Arduino Nano User Manual, V2.3 Arduino Microcontroller Guide, Ver. Oct-20 Arduino Programming Notebook, V 1.1, First Edition August 2007
© Pinball News 2017 |